612-470-8575
Thinking of Buying or Selling? We have top real estate partners nationwide! Reach out first for expert guidance and a home value report. Click the "Request a Quote" Button to connect!
Pouring Concrete
The key to pouring concrete correctly is having the proper tools and timing. Here are the tools and supplies needed:- Wheelbarrow(s) - or a way to get the concrete from the truck to the patio (eg. powerbuggy, concrete pump)
- Shovels, Garden Rake or Concrete Rakes - choose one or more
- Bow Float and Handles
- Screed Board (eg. 2X4 lumber) - needs to be the length of your patio
- Optional: Rubber Boots (concrete can burn the skin)
Pouring the Concrete:
Step #1
Order concrete delivery or make your own concrete. If you are ordering the concrete, order a 4000 psi, 6% air, 5 slump mix (slump is the consistency of the concrete - how dry or wet it is).
Step #2
If you ordered concrete, after your truck arrives, have the driver of the concrete truck pour out some concrete in your wheelbarrow to determine if it is the right consistency (or slump). If the concrete is pliable and pours well, it is ready for your patio.
Step #3
Start dumping the concrete in your patio forms. Start at one side of the patio and work your way to the other. Fill to the top of the form on one side and then work back. Don't forget to pull the wire mesh up with gloved hands (if you are using wire mesh - see concrete reinforcement for more information).
Step #4
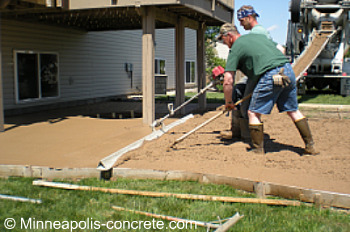
Fill your patio full on one side and take the Screed Board (2X4) and run it across the top of your forms to level off the concrete. While you are doing this, have an additional person rake back the excess into the area that has not been filled.
The picture above shows one person raking back the excess into an area that hasn't been filled, but the other man is using a power screed instead of a regular 2X4 screed board. This is a large patio. Power screeds are faster and more convenient to use on big projects.
Step #5
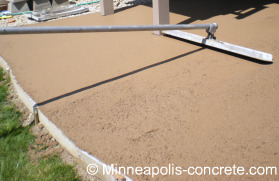
With a bow float, seal up what you just leveled off. To do this, take the bow float and run it back and forth over the wet concrete until it is sealed. You will know it is sealed when you don't see the rocks any more.
Step #6
Fill the patio 1/2 way full and repeat steps 4 and 5.
Fill the patio 3/4 way full and repeat steps 4 and 5.
Step #7
When you get down to the end, you will be able to make a better judgment of how much concrete you need to finish. Only put as much concrete in as needed, because you will not want to level this final section off and get overflow into the lawn. You will need to seal up the final section with a bow float, though.
The next step in the process of pouring your own concrete patio is concrete finishing.
Does pouring concrete seem like too much work?
If so, and you live in the Minneapolis and surrounding suburbs area, request a quote on your project.
DIY Concrete › Pouring Concrete
License # BC721668


New! Comments
Have your say about what you just read! Leave me a comment in the box below.