612-470-8575
Concrete Reinforcement
Concrete reinforcement is added to make sure the concrete holds up well. Install this after you have compacted the fill and made your final grade.
Materials
The most common reinforcements used in patios are fiber mesh, rebar, and wire mesh. You may use one or a combo of any of these. Using all three will result in a stronger patio.
- Fiber Mesh - This concrete reinforcement is an additive that comes in the concrete mix. If you are having your concrete delivered, request this material in your concrete. You'll pay the concrete supplier for this, but it will not involve any additional labor on your behalf. Fiber mesh is a great option to prevent cracking. But, if the concrete cracks after adding fiber mesh, the fiber mesh itself will not prevent expansion of the crack. Rebar and wire mesh will. Therefore, it's a good idea to combine fiber mesh with either rebar or wire mesh.
- Rebar - The best option for keeping the patio from falling apart through the years. In addition to purchasing rebar, obtain wire ties or a spool of wire, and optional rebar stands.
- Wire Mesh - Less expensive than rebar, but not as strong. It's the happy medium between rebar and fiber mesh when it comes to strength. Wire mesh is also easier to install than rebar, but is cumbersome to deal with. The rolls of wire mesh can be difficult to lay out, and it involves more labor during the concrete pouring step as you'll need to frequently pull it up so it doesn't sink to the bottom of the wet concrete. Obtain a bolt cutter, or a metal saw to cut wire mesh.
Installation of Rebar Concrete Reinforcement
Step #1
Determine how much rebar is needed. Rebar usually comes in 10 or 20 ft sticks. It may be purchased through any home improvement store, lumber yard, or concrete supplier. Rebar comes in different diameters (gauges) - 3/8", 1/2", 5/8" and up. For a patio, 1/2" is often used, but 3/8" is sufficient and less expensive. Use a skill saw with a metal blade or any tool with a metal blade to cut the rebar. Read the steps below to determine how much rebar is needed and measure appropriately or use this interactive calculator.
Step #2
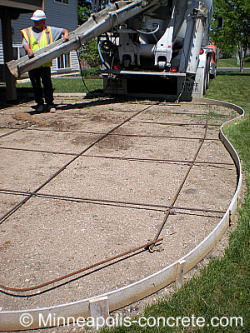
Lay the rebar in small grids. Grid lines are typically 4 ft long. Achieve an even stronger slab by making the grids smaller. In bad soil, consider this option. At the intersections, use the wire ties to tie the crossing rebar sticks together. An inexpensive (usually under $10) special tool called a "tying tool" may be used to attach the wires at the intersections.
Step #3
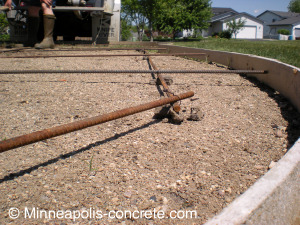
Once the grids are tied, lift the rebar off the ground. Use rebar stands or pieces of brick, block and stones. Try to get all of the rebar off the ground and in the center of the patio's depth. Since most patios are 4 inches thick, the rebar should be raised 2 inches off the ground. Pictured below: Stones placed under the rebar grids.
Installation of Wire Mesh Concrete Reinforcement
Step #1
Roll out the wire mesh to match the size of the patio (two people are needed). Wire mesh comes in rolls 5 ft. wide by 100 ft. long (therefore covering 500 square ft.) obtained through a home improvement store. Wire mesh also comes in 10 X 10 sheets. This is the easiest option because you won't need to unroll it, but it's more expensive.
Step #2
Cut the wire mesh with a bolt cutter or a metal saw. Since the wire mesh wants to rebound back to its roll position, flip the wire mesh over. Place the mesh flush to the concrete forms.
Step #3
As you continue to cut and place wire mesh, make sure the seams overlap each other a minimum of 6 inches. This helps prevent cracking.
Step #4
This step happens when the concrete is poured. As concrete is poured over the wire mesh, it will need to be "pulled up" so that it's not sitting on the ground. As you start to pour, hold up the wire mesh with your hand and pour through it. When you let go of the wire mesh, it will lay in the center of the concrete. You may need to push it down a little so it doesn't show. It must be at least an inch below the surface.
The next step in pouring your own concrete patio is to install concrete expansion joints.
If installing your own concrete reinforcement seems like too much work and you live in the Minneapolis and surrounding suburbs area, request a quote on your concrete project here.
DIY Concrete › Concrete Reinforcement
License # BC721668


New! Comments
Have your say about what you just read! Leave me a comment in the box below.